If the traversable surfaces of the original source mesh is projected onto the xz-plane and overlayed with the polygon mesh generated in the previous stage, the two will match up quite well. But in 3-dimensional space the polygon mesh may not adequately follow the height contour of the source mesh. This stage adds height detail such that the detail mesh will match the surfaces of source mesh on all axes. To accomplish this we iterate over all of the polygons and insert vertices along the polygon edges and within its surface whenever the polygon deviates excessively from the source mesh.
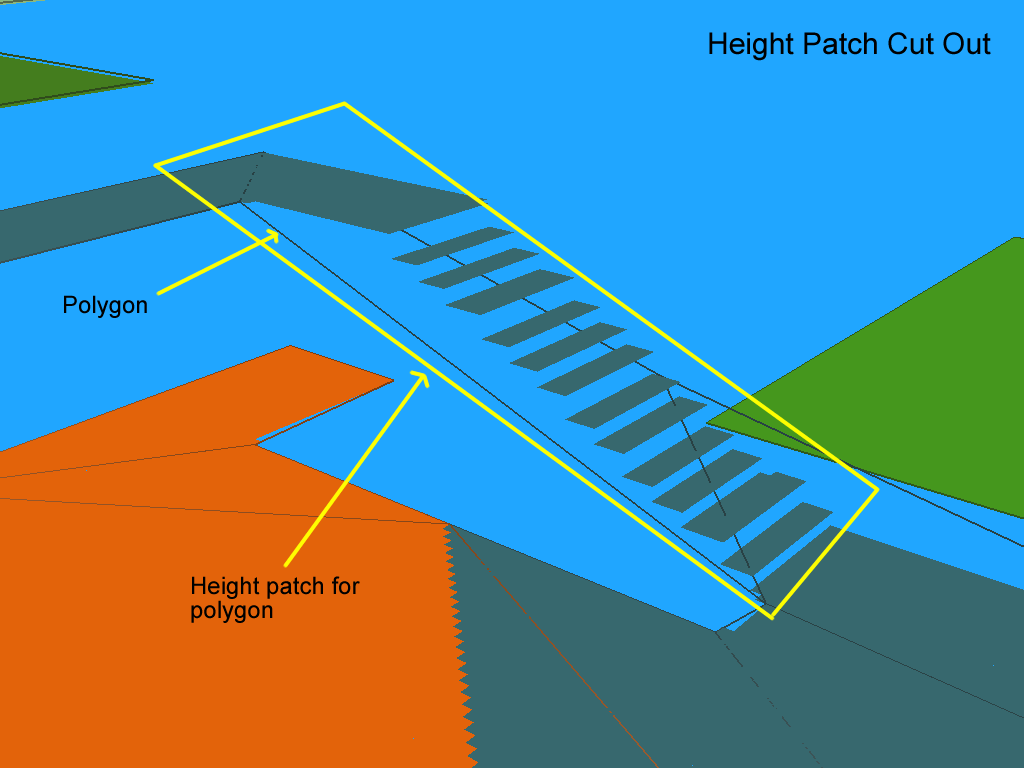
In the following example, the polygon mesh in the vicinity of a stairway matches on the xz-plane, but deviates by a large amount on the y-axis.
在添加了高度细节后,y轴匹配要好得多。
原文
The y-axis match is much better after height detail is added.
Technically, from a path-finding perspective, this step is not required. A convex polygon mesh is all that is needed to generate a graph suitable for use with path-finding algorithms, and the polygon mesh created in the last stage provides all the necessary data. This is especially the case for situations where physics or ray-casting is used to place an agent on the surface of the source mesh. In fact, Recast Navigation's Detour library only uses the polygon mesh for pathfinding. The height detail generated by this stage is considered optional, and when included it is only used to refine point positions returned by various Detour functions.
It is also important to note that this process will still only result in a better approximation of the surfaces of the original mesh. The voxelation process guarentees that exact positions will never be possible. Besides that, excess height detail is often worse than too little detail due to search performance and memory considerations.
So you thought you were done with voxel space and heightfields? Well, not quite. In order to add height detail we need to be able to determine if the surface of a polygon is too far from the open heightfield spans from which it was derived. The height patch is used for this purpose. It contains the expected height for each open heightfield grid location a polygon intersects. Basically, it is a simplified cutout of a section of the open heightfield with the following characteristics.
It only contains height information for the AABB of a single polygon.
It only contains the floor height for each grid location. (No spans.)
It only has a single height for each grid location. (No overlapping.)
The main steps in this stage are as follows. For each polygon:
1. Sample the hull edges of the polygon. Add vertices to any edge that deviates by more than the value of contourMaxDeviation from the height patch data.
2. Perform a Delaunay triangulation of the polygon.
3. Sample the internal surface of the polygon. Add vertices if the surface deviates by more than the value of contourMaxDeviation from the height patch data. Update the triangulation for any new vertices.
This step better matches the height of the polygon edges with the data in the height patch. It is the first of two sampling passes, with the second pass dealing with the polygon surface.
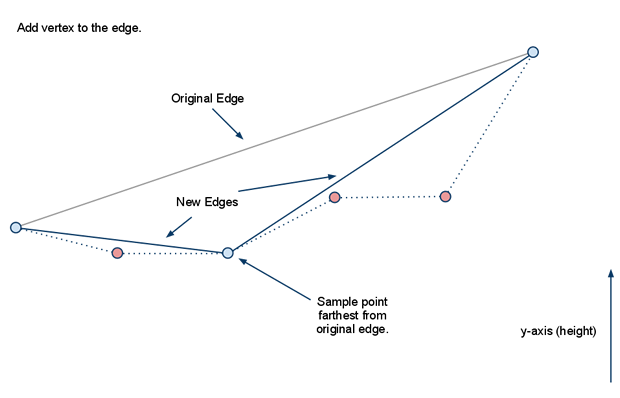
Get ready for some 2D. For the next group of visualizations, we are looking at the mesh from the side, with the y-axis up
For each edge in the polygon: Split the edge into segments based on the value of contourSampleDistance. E.g. If the edge is 10 units long and the sample distance is 2 units, then break the edge into 5 segments of equal length. Not all of these "sample vertices" will be used. These are only potential vertices at this point.
使用高度补丁数据将每个样本顶点的高度(y 值)对齐到高度场。
原文
Use the height patch data to snap the height (y-value) of each sample vertex to the heightfield.
检查样本顶点与原始边的距离,如果超过最大偏差,则插入距离原始边最远的样本顶点。
原文
Check the distance of the sample vertices from the original edge. If the maximum deviation is exceeded, insert the sample vertex that is farthest from the original edge.
重复距离检查,直到多边形的新部分完成。
原文
Repeat the distance checks until the new section of the polygon is complete.
There is plenty of information on Delaunay triangulation on the web, so I won't cover it here except to say that it is used to triangulate the the polygon after adding detail to the edges. After this point the original polygon no longer exists. All operations are on a mesh of triangles.
This is the first of potentially multiple triangulations. From this point on, a re-triangulation will occur when any new vertex is added to the mesh.
At this point we have a small mesh of triangles instead of a single polygon. (Or, if the original polygon was a triangle and no new vertices were added in the edge detail step, we may still have a single triangle.) All vertices are still on the edge of the mesh. During this step, we check the internal surface of the mesh to see if it deviates too much from the data in the height patch.
The next group of visualizations is still in 2D. But we switch to a top-down view of the xz-plane.
The concept of adding height detail to the internal surface of the triangle mesh is similar to adding detail to the edges. A grid of sample vertices is built across the xz-plane of the mesh's AABB. The spacing is based on the value of contourSampleDistance. The y-axis values of the sample vertices are snapped to the data in the height patch.
网格(mesh)外的样本顶点被丢弃。
原文
The sample vertices outside of the mesh are discarded.
Of the surviving sample vertices, find the one that is farthest from the surface of the triangle mesh. If it is farther than the value of contourMaxDeviation, then add it to the mesh and re-triangulate.
重复这个过程,直到没有样本顶点超过contourMaxDeviation 的值。
原文
Repeat the process until no sample vertex exceeds the value of contourMaxDeviation.
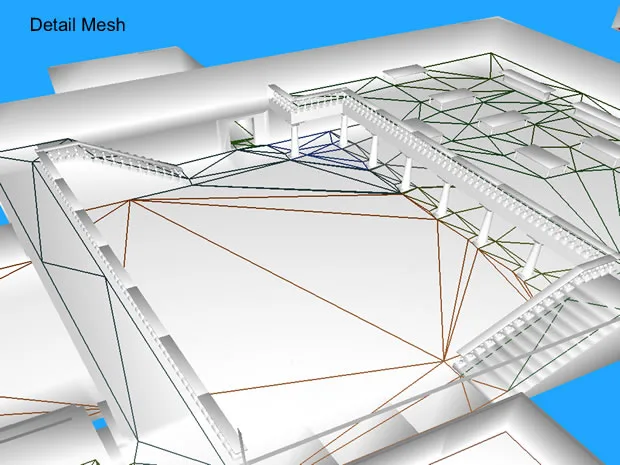
The rest of the work in this stage is administrative operations. The detail triangle meshes that were created from the individual polygons are merged into a single mesh and loaded into the an instance of TriangleMesh. The entire process is complete. We have a navigation mesh.